
Hello, my little bloglets! After a shamefully long hiatus since my last post--a combination of getting a job(!) and really, truly not doing much interesting cooking while spending weekends at friends' apartments, down the shore, etc.--I am back in the saddle.
First things first: Waaaay back in early May, I spent the night before a
big race at the apartment of two very dear friends, and I wanted to bring some comestible to thank them for their hospitality. My usual go-to, the cheapest bottle of respectable-looking wine I can find, didn't seem to jive with our plans (carb-load, sleep well, rise early); nor did any baked good I could think of and had time to make. Something delicious, light, perhaps small-portioned was what I needed. I decided on two things: almond-stuffed dates rolled in shredded coconut, and chocolate-dipped dried apricots. (Fruit, no matter how adulterated and dessert-ified, always seems relatively virtuous.) Recipes don't seem to make sense for these guys, but here goes:
- Almond-stuffed dates rolled in shredded coconut: Use the best dates you can find. (I adore Woodstock Farms's medjools that come in the resealable clear plastic bag.) Remove stem end if necessary, then make a small slit lengthwise along the date with a paring knife (running in the same direction as the pit) and, using the point of the knife to help you, gently pop out the pit without otherwise cutting the flesh of the fruit. Slip one whole almond into the cavity left by the pit, and gently squeeze the two cut sides of the date back together. Roll date in a bowl with some shredded coconut in the bottom to coat. (Not a ton of coconut stuck to my dates, but they were still amazing!)
- Chocolate-dipped dried apricots: The name pretty much says it all, but here's what I did: I melted most of a bar of Scharffen Berger 70% cacao bittersweet chocolate in my DIY double boiler, then dunked apricots about halfway into the chocolate and laid them on a parchment-lined baking sheet. I ran out of apricots before I ran out of chocolate, at which point I began rooting through the cabinets searching for anything that would (could) be made better by its introduction into melted chocolate. I found quite a few: pretzel nuggets, dried blueberries, coffee beans. All these were dunked, then laid out on the parchment and popped into the fridge to let the chocolate set. The coffee beans actually imparted their flavor into the chocolate, which mean that the pretzels I dunked afterward had a hint of coffee--which wasn't awful, but also wasn't so good as the pretzels I dunked before the chocolate.
So that was the bulk of my kitchen activity for the month of May. I have kicked things off for June with a bold, daring move: a dessert that most people of my generation have never heard of, to surprise my dad for his birthday yesterday. That dessert is icebox cake, and it both appeals to me for its distinctive, almost science-experimenty preparation (put cookies and whipped cream into the fridge, and out comes a cake!) and horrifies my natural-whenever-possible approach to cooking. This is because the key ingredient is Nabisco Famous Chocolate Wafers, a near-paper-thin chocolate cookie that I keep likening to the outside of an Oreo that, because it was made back when my dad was a tot, undoubtedly contains scary, possibly man-made or -bastardized ingredients. I refused to look closely at the ingredients list which, from a glance, looked alarmingly long. There will probably come a day when my curiosity and healthful-mindedness will drive me to make these cookies from scratch, thanks to the help of
my favorite food blogger, but for now, in the name of authenticity and making something for my dad that I know he'd like, I went for the storebought cookies.
Icebox cake and cupcakesAdapted from: the back of the box of Nabisco Famous Chocolate Wafers, Smitten Kitchen and anectdotal accounts from my dad and Dorothy Noble, my godmother and auntYield: at least one cake, maybe two, depending on how long you make them, or quite a few cupcakes if you go that route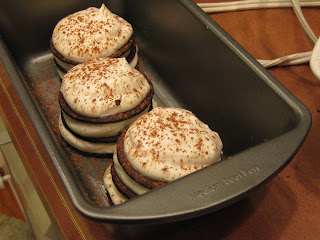 3 c. heavy cream
3 Tbsp. sugar1 Tbsp. vanilla extract1 box Nabisco Famous Chocolate WafersUnsweetened cocoa powder, for dusting1. Combine heavy cream, sugar and vanilla, and using an electric mixer, whip on high speed until cream forms soft peaks. (I think this took me only about 2 minutes.)2. If making icebox cake: Spread about 1/2 Tbsp. whipped cream on the top of one cookie, top with another cookie, spread that cookie's top with 1/2 Tbsp. whipped cream, and continue the process, building a stack on a serving plate or baking pan. (The stack needs to be tall enough that it can support itself when you stand it on its side, but not so tall that inverting it onto its side is difficult and unwieldy.) When you have a nice little stack going, gently pick it up and set it, horizontally, on its side. Then top another cookie with whipped cream, and affix it to the end of the sideways stack, continuing until you have a long roll. Cover roll with remaining whipped cream. Note: I didn't actually do it this way. This is how you're supposed to do it, but in a fit of thriftyness (I don't want to waste any of these cookies!) and curiosity (I stupidly decided to use this wide loaf pan... I wonder how I can best take advantage of its space?), I made two rows of slightly overlapping cookies with whipped cream in between, to make a kind of double-wide roll.3. If making icebox cupcakes: It's a good idea to start with big cupcake papers. Sort of open/flatten the papers a bit (the diameter of the cookies will probably exceed the diameter of the bottom of the papers), and set out several on a cookie sheet. Spread about 1/2 Tbsp. whipped cream on the top of one cookie, top with another cookie, spread that cookie's top with 1/2 Tbsp. whipped cream, and continue the process, building a stack of about 3-5 cookies, depending on how big you want them. Plop each little stack into a cupcake paper, then move on to the next. The photo above shows the three junior cupcakes I made with the whipped cream and cookies remaining after I'd filled my big loaf pan.4. Dust (cup)cake(s) with cocoa powder, cover with plastic wrap and refrigerate overnight. Or, as my aunt says, "as long as it takes for the cookies to soften," which is the whole point--the crisp cookies gain moisture from the whipped cream (and probably their overnight stay in the chill chest) and achieve a cakelike consistency. It tastes like ice cream sandwiches. It is AWESOME. Even if, like me, you really don't know what you're doing, it ends up being really tasty and retro-feeling.Of course, when my pops ate his slice, he said, "It's good." Momentary pause for consideration, then: "But it's not exactly how my mother made it. I think she actually put it in the freezer for a while." None of my recipes had told me to do so, but I'll give you one guess of where the leftovers are going to hang out.
Oh, PS: At some point in the last month, I made a strawberry smoothie. I don't know how I made it, and I hadn't even remember
that I made it, until I found the photo on my camera. I have a feeling that yogurt, maybe some milk and a little wheat germ were also invited to the party, but as for quantities or specifics, your guess is as good as mine.
 This weekend, there was a brownie lover in my midst. It was my sister's boyfriend, and we were all together to celebrate my mom's birthday. But as it turns out, the brownie lover would be celebrating his birthday soon, so at the last minute I was informed that we would be celebrating two birthdays at once. With my limited financial resources, I thought it wise to stay home and make his gift than hopping in my car to go buy something (which, feeling the way I was after my 15-mile run, seemed like a bad idea for me and everyone else on the road).


